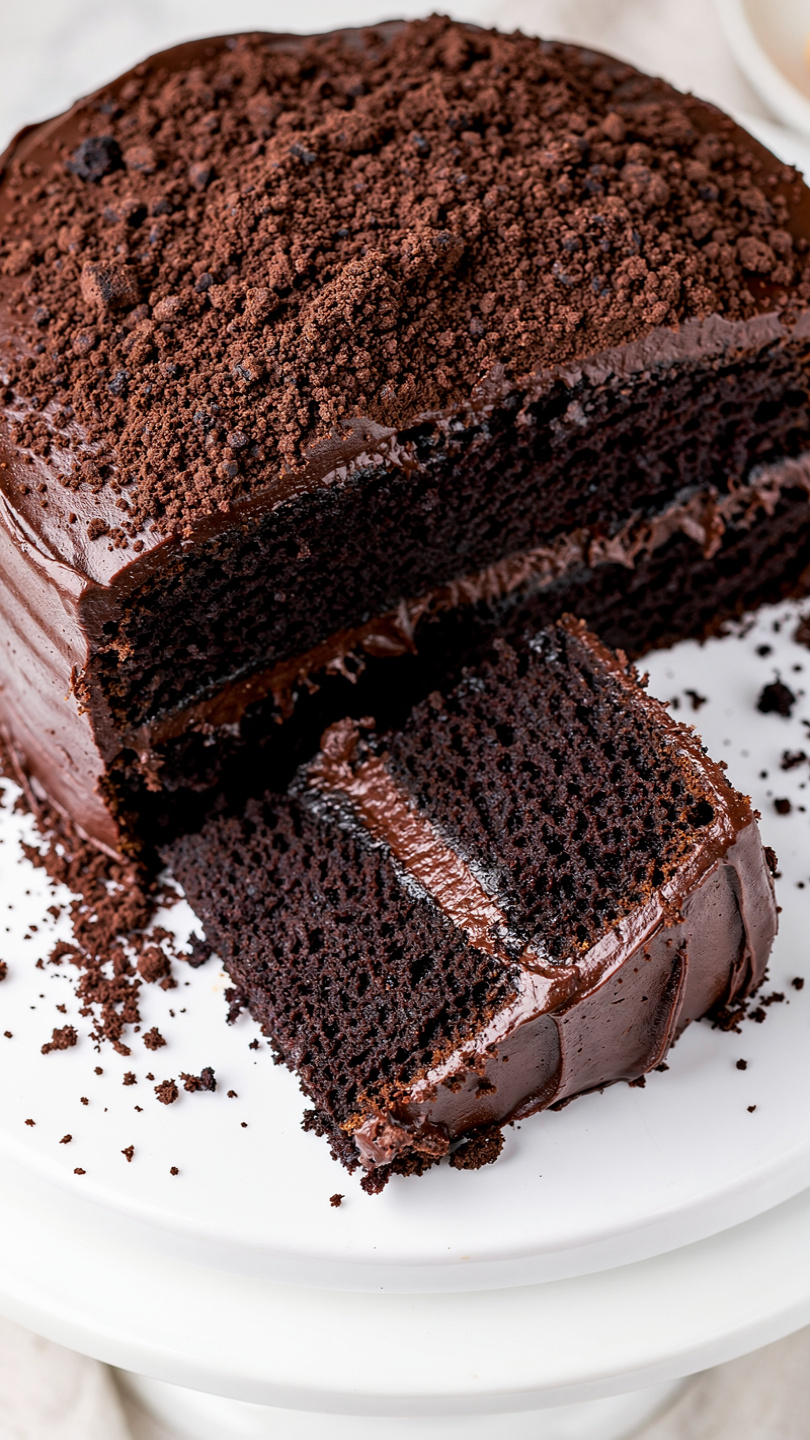
Brooklyn Blackout Cake: The Ultimate Chocolate Layer Cake
This legendary Brooklyn Blackout Cake stacks rich chocolate cake layers with a deeply fudgy pudding filling and a blanket of chocolate crumbs for an unforgettable showstopper dessert.

The Cake That Made Brooklyn Famous
Some desserts are good. Some are memorable. And then there is the Brooklyn Blackout Cake, a towering, jet-black masterpiece that belongs in a category entirely its own. This legendary layer cake is built on deeply fudgy chocolate cake, filled with a rich chocolate pudding that borders on mousse, slathered in silky chocolate buttercream, and then encased in a crunchy coat of chocolate cake crumbs. It is, quite simply, one of the greatest chocolate cakes ever conceived.
The original was created by Ebinger's Bakery, a beloved Brooklyn institution that operated from 1898 until it heartbreakingly closed in 1972. The name "blackout" is said to reference the World War II blackout drills practiced along the Brooklyn coastline. Whatever the origin, the legacy is undeniable. Bakeries, home bakers, and pastry chefs have been chasing that original recipe ever since, and this version gets you remarkably close.
Getting the most out of this recipe comes down to quality ingredients and the right equipment. A good stand mixer makes the frosting silky, and Dutch-process cocoa powder is non-negotiable for that signature dark, intense chocolate flavor.
Tools & Ingredients We Recommend


Why This Recipe Works
There are three components that have to sing together for a true Blackout Cake, and each one has a job to do.
- The cake layers use hot brewed coffee to bloom the cocoa and amplify the chocolate flavor without tasting like coffee at all. Vegetable oil keeps the crumb impossibly moist.
- The pudding filling is cooked low and slow on the stovetop with bittersweet chocolate stirred in at the end. Chilling it fully before assembly is what gives every slice that clean, dramatic layer.
- The crumb coating is the genius of the whole thing. A crumbled cake layer pressed onto the outside adds texture, drama, and an extra hit of chocolate in every single bite.
Chef's Tip: Dutch-process cocoa is essential here. Natural cocoa will produce a lighter, slightly acidic cake that does not have that signature near-black color. If you can only find natural cocoa, reduce the baking soda by half and expect a slightly different depth of flavor.
Building the Perfect Blackout Cake
This cake rewards patience. The pudding needs to be fully cold before it goes between the layers, or it will slide around during assembly. Make it the day before if you can. Similarly, the cake layers should be completely cool, and a brief 20-minute chill after the crumb coat will make the final layer of frosting go on like a dream.
When you crumble that reserved cake layer, do not be shy. You want fine, even crumbs that will pack densely against the frosting. Press them in gently with your palms and let the natural stickiness of the buttercream do the work.
Note: The assembled cake actually tastes better on day two. The pudding softens the cake layers slightly as it sits overnight, creating that perfectly fudgy, melded texture that made the original Ebinger's version so mythic. Build it the day before you plan to serve it if you can.
Ready to build something legendary? Here is the full step-by-step recipe:
Brooklyn Blackout Cake: The Ultimate Chocolate Layer Cake
This legendary Brooklyn Blackout Cake stacks rich chocolate cake layers with a deeply fudgy pudding filling and a blanket of chocolate crumbs for an unforgettable showstopper dessert.
Ingredients
- 2 cups all-purpose flour, spooned and leveled
- 3/4 cup Dutch-process cocoa powder, sifted
- 2 tsp baking soda
- 1 tsp baking powder
- 1 tsp fine sea salt
- 2 cups granulated sugar
- 3 large eggs, room temperature
- 3/4 cup vegetable oil
- 1 cup buttermilk, room temperature
- 1 cup hot brewed coffee, strong brew; deepens chocolate flavor
- 2 tsp pure vanilla extract
- 2 1/2 cups whole milk, for the pudding filling
- 3/4 cup granulated sugar, for the pudding filling
- 3/8 cup Dutch-process cocoa powder, for the pudding filling, sifted
- 3 tbsp cornstarch, for the pudding filling
- 2 tbsp unsalted butter, for the pudding filling, cold and cubed
- 4 oz bittersweet chocolate, for the pudding filling, finely chopped; 70% cacao preferred
- 1 cup unsalted butter, for the frosting, room temperature
- 3 cups powdered sugar, for the frosting, sifted
- 1/2 cup Dutch-process cocoa powder, for the frosting, sifted
- 1/4 cup heavy cream, for the frosting
- 1 tsp pure vanilla extract, for the frosting
Instruction
Preheat the oven to 350 degrees F (175 degrees C). Grease two 9-inch round cake pans and line the bottoms with parchment paper.
In a large bowl, whisk together the flour, cocoa powder, baking soda, baking powder, salt, and sugar until fully combined.
In a separate bowl or large measuring cup, whisk together the eggs, vegetable oil, buttermilk, hot coffee, and vanilla extract.
Pour the wet ingredients into the dry ingredients and whisk until just smooth. Do not overmix. The batter will be thin.
Divide the batter evenly between the two prepared pans. Bake for 32 to 35 minutes, or until a toothpick inserted in the center comes out with just a few moist crumbs.
Let the cakes cool in the pans for 15 minutes, then turn out onto a wire rack and cool completely before assembling.
While the cakes bake, make the chocolate pudding filling. In a medium saucepan, whisk together the milk, sugar, cocoa powder, and cornstarch over medium heat. Cook, stirring constantly, until the mixture thickens and begins to bubble, about 8 to 10 minutes.
Remove the pudding from heat and stir in the cold butter and chopped bittersweet chocolate until fully melted and smooth. Transfer to a bowl, press plastic wrap directly onto the surface, and refrigerate until completely cold and thick, at least 2 hours.
Make the chocolate frosting. Beat the room-temperature butter on medium-high speed for 3 minutes until pale and fluffy. Add the sifted cocoa powder and powdered sugar one cup at a time, alternating with splashes of heavy cream, beating well after each addition. Add the vanilla and beat on high for 2 minutes until silky and spreadable.
To assemble, use a long serrated knife to slice each cooled cake layer horizontally in half, giving you 4 layers total. Set aside the most imperfect-looking layer to crumble into crumbs for the coating.
Place the first cake layer on a serving plate or cake board. Spread a generous layer of the chilled pudding filling over the top, stopping just short of the edge. Repeat with the second and third layers.
Place the final layer on top and apply a thin crumb coat of chocolate frosting over the entire cake. Chill for 20 minutes, then apply a final, thicker layer of frosting over the top and sides.
Crumble the reserved cake layer into fine crumbs with your hands. Press the crumbs firmly onto the top and all sides of the frosted cake, covering it completely.
Refrigerate the finished cake for at least 1 hour before slicing. Serve at room temperature for the best texture and flavor.
Equipment
- Two 9-inch round cake pans
- Parchment paper
- Stand mixer or hand mixer
- Large mixing bowls
- Medium saucepan
- Whisk
- Rubber spatula
- Long serrated knife
- Offset spatula
- Wire cooling rack
- Cake board or serving plate
Notes
Serving and Storing Your Blackout Cake
Serve this cake at room temperature for the best texture. The pudding filling firms up considerably in the fridge, so pull it out 20 to 30 minutes before slicing for clean, dramatic cuts and that fudgy, yielding bite.
For clean slices, run a long sharp knife under hot water, wipe it dry, and cut in one smooth motion. Repeat between each slice.
Leftovers keep covered in the refrigerator for up to four days, though it rarely lasts that long. Individual slices can be wrapped tightly and frozen for up to two months, making this an ideal make-ahead celebration cake for birthdays, anniversaries, or any occasion that calls for something truly extraordinary.